How to merge images
|
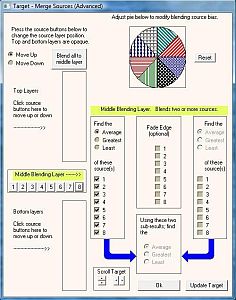
Use this dialog box in the program to set the way images are merged together on a pixel by pixel basis. Top layers will overlay and hide all other images. Parts of, or all of the bottom layers will appear if the middle or top layers are not present at that location. Middle layers are where the different blending/mergeing methods apply such as 'average', brightest', 'most/least colored' etc. Press 'Update target' to view the effects on the fly. This example shows 6 source images loaded but remember you are allowed a maximum of 8 images down to a minimum of 2. |
|
The pie chart on the left allows setting of the relative weightings of the different sources during the merge process. Use the left-mouse on it to drag and modify the different sectors (weightings) Fade edge as the name suggests allows other images to smoothly peek through near and at the edge. Use the scroll target buttons to view different parts of the image if it is much larger than the window. The choices of merging in the middle layers are:
|
|
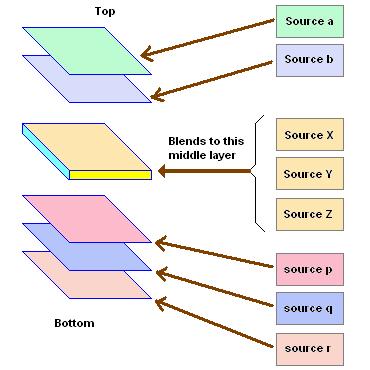
Concept of layering and middle layer blending. |
||
|
You can assign any number of sources images to the top and bottom and to the middle layer. Use the buttons on the left of the box to shuffle the images to the top, bottom or middle as you wish. |
|
In this diagram of 8 source images 'X', 'Y' and 'Z' are assigned to the middle blending layer. X,Y and Z are of course numbers. In the box above all 6 source images are assigned to the middle blending layer. However the images can be distributed anywhere such as 4 at the bottom , 2 at the top and none in the middle. As mentioned before, 'a' and 'b' are always visible. Outside those regions of 'a' & 'b', blends of 'X', 'Y' and 'Z' will show. Outside of these regions of a, b, X, Y, and Z (if they exist), P,Q and R will show through (in that order). |